Showing posts with label the. Show all posts
Showing posts with label the. Show all posts
Wednesday, March 5, 2014
Make the little whistle too!
A few people were asking for more details about the little whistle I showed at the end of yesterdays video, so I shot a video this morning. They are incredibly easy to make. In fact, you could just make one with part of a tree branch and a pocketknife.
And if you want a loud noisemaker for New Years Eve, this is the one. You could make a whole batch and be the life of any party. Yeah.
*****
Read More..
And if you want a loud noisemaker for New Years Eve, this is the one. You could make a whole batch and be the life of any party. Yeah.
*****

Tuesday, March 4, 2014
The Kreg Keg Crate
The title is a bit of a tongue twister, but I like the alliteration. Mercifully, I spared us a cutsie — and unfortunate — spelling of crate with a K. And, well, it isnt even close to keg-sized.
After kicking around a number of ideas for my Kreg Jig project, I finally got my fancy sketches completed and everything measured out. Getting accurate measurements of various beer bottles was the trickiest part.
Typically, the Kreg Jig is used in furniture making and other large projects. What I wanted to show with this project is that the Kreg Jig can be useful for a woodworking hobbyist to make small things.
I encourage you to check out the videos on the Kreg web site and see some of the neat stuff you can do with it. I’m definitely going to be putting it to the test on picture frames.
Read More..
After kicking around a number of ideas for my Kreg Jig project, I finally got my fancy sketches completed and everything measured out. Getting accurate measurements of various beer bottles was the trickiest part.
Typically, the Kreg Jig is used in furniture making and other large projects. What I wanted to show with this project is that the Kreg Jig can be useful for a woodworking hobbyist to make small things.
I encourage you to check out the videos on the Kreg web site and see some of the neat stuff you can do with it. I’m definitely going to be putting it to the test on picture frames.
Monday, February 24, 2014
I HACKED THE HEMNES SECRETARY DESK
Im not sure what constitutes an official Ikea Hack but check out what I did to
an Ikea Hemnes Secretary Desk.

Below to the left is what an original Hemnes Secretary Desk looks like (older model)
On the right is how it looks after I replacing the legs with curvy dining table legs.
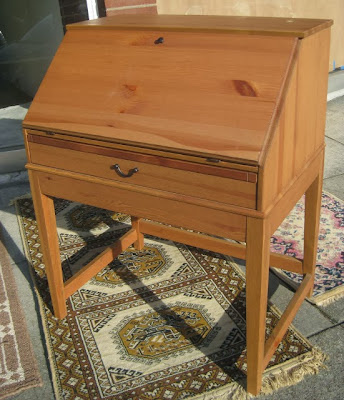

BEFORE AFTER

The Hemnes Secretary Desk is all pine wood and the top portion is all complete and can be
separated from the bottom by undoing eight "L" brackets.
That will leave you with a simple base frame to work with. You can see each of the
brackets sitting at the top edge on the inside of the frame.

These metal corner brackets are original and held the straight leg in place. I moved them
down to line up with the threaded rod of the replacement leg.


I then reattached the top to the base and painted it in a creamy distressed white.


There is a bankers chair that goes with the desk. It is a modern oak chair with a really
high lift that works perfectly with the desk. I cut out areas for the chair arms to tuck right
under the desk when its not being used.
This IKEA Hacked secretary desk with bankers chair is listed on the SHOWROOM page with
price and dimensions.
************************************
FOUR LETTER WORDS THE SECRET TO AN AMAZING CHRISTMAS BED

My four letter word is *SNOW*. What would your four letter word be?
Careful now we are talk about Christmas!
For this decorating project I printed out letters on regular white paper, cut them out, and taped
them in place on my window. The snow flakes are tree ornaments also secured with tape. You can do
this on most any window or mirror and you just have to think of how many letters you want your
word to have and think of all the Christmas words available to you ...
JOY - ELF - TOY - NOEL - STAR - DEER -SNOW - MERRY - SANTA - PEACE - FAMILY
and so on.


Now for my easy Christmas bedding tip ...
What I have done is buy an inexpensive red plaid sheet set and paired it with my white bedding.
A sheet set usually comes with pillow cases, a flat sheet, and fitted sheet. This is more than enough
red and plaid to set the holiday mood in the bedroom without buying a new comforter or cover.
You can either have a large fold over of the flat sheet or you can use it to cover everything.
Ive also added a warm knitted throw at the foot and this can all be used long after Christmas.
Try to avoid spending money on bedding that is exclusively Christmas themed.

********************************************
Here is a peak at where I store my Christmas stuff, its a storage box spring under my bed.
Years ago I was about to get rid of my box spring all together until I found this option.
My Christmas decorating has been stored in there ever since.

*************************************************
And I have added some new mirrors to the Accessories page:
http://blogspot.ca/p/mirror-for-sale.html


This large ornate one would be great just about anywhere in your home.
And below I have 2 of these vintage tall wood mirrors.
Maybe use both in a hall way or just one for a dressing mirror.


The Chair is NSF.
Wednesday, February 12, 2014
When the Bow breaks
I bought a Gramercy Tools bow saw at Tools for Working Wood in NYC a couple of years ago and it has turned into one of my very favorite tools.
It’s a nice gentle shape, really light weight with well made parts that work really well.
I use it for all of the typical bow saw tasks like sawing curves, pierced work and the like. I soon realized it was also perfect for waste removal. Using the bow saw much the same way you would a fret saw or maybe a coping saw removing the waste in dovetails.
Not so long ago I took it apart for transport and when I reassembled it and put tension back on the bow-
always right in the middle of a project isn’t it?
Well, I better fix it.
Nothing fancy, no time for that, just a quick fix with some quarter sawn Ontario white oak.
The straight grain will be perfect for this application.
It went something like this…


Read More..
It’s a nice gentle shape, really light weight with well made parts that work really well.
I use it for all of the typical bow saw tasks like sawing curves, pierced work and the like. I soon realized it was also perfect for waste removal. Using the bow saw much the same way you would a fret saw or maybe a coping saw removing the waste in dovetails.
Not so long ago I took it apart for transport and when I reassembled it and put tension back on the bow-
SNAP !
; (
Damn…always right in the middle of a project isn’t it?
Well, I better fix it.
Nothing fancy, no time for that, just a quick fix with some quarter sawn Ontario white oak.
The straight grain will be perfect for this application.
It went something like this…
this is the worst noise ever- the crack of hickory.
On an off cut of white oak I trace the one good arm.
scribe the width and grab my favorite rip saw.
check for length and scribe.
clean and square with the jack plane.
x-cut at the bench with 14" back saw.
the top tapered area is marked.
mark the mortise location and drill for turned handle pin.
brad point bit exact width of mortise.
two chisels- exact width and length of mortise...
makes for quick work.
x-cut profile- saw kerf establish depths.
bust out the waste and quickly clean with rasp and file.
back to work !
The Tools of the Trade Show
The Tools of the Trade Show took place today in Pickering, Ontario. This is one of the very few vintage tool shows that happen in Canada, so few in fact, the promoters are able to run it twice a year; a spring show in April and a fall show in October.
In the past two years I have found that the dealers had more tools on their tables than there were potential customers to buy them. This year I felt this ratio was in reverse. I think some of the dealers were gun-shy, so they cut back on their inventories and displayed less. As a sign the economy is possibly turning around, I think the buying numbers swelled this year but faced a lesser number of choices. It is possible that I also overheard more haggling over price this year than I have heard in the recent past. As an example of this, I returned to one dealer to talk price about a plane I saw about 75 minutes previous only to find that the plane gone, along with about 90% of the rest of his inventory. I mentioned that it looked like he did quite well that morning and he answered that he thought his customers made out much better than he did. Signs that displayed, "Prices are negotiable" were commonplace.
Doug Orr, the writer of all things vintage in the Lee Valley Tools Newsletters, had his booth up and running, crammed full of wood moulding planes (sadly, no H.E. Mitchells) and other tools of quality. We discussed a beautiful, but unmarked, ¾" steel shoulder plane with what I think was a walnut infill that I picked up off his table. This thing was amazingly built with a price of $155. He told me that it had an $85 blade in it, which barely poked out of the finest mouth I have ever seen on any plane. The mouth was so fine in fact, that I reluctantly put it back on the table. Looking at the mouth of that plane, I knew that with my limited plane abilities at this point, I was looking at buying $155 worth of pure frustration. Maybe one day, when my skills with these things improve, I wont be so quick to put things down that intimidate me, but today wasnt that day.

I also got to hold my first Stanley No.1 Bench Plane this morning, which was quite an event, I can assure you. I saw this little plane sitting on a rack in Dave (ToolRush) Carrieres big booth. The bed was unmarked, the lever-cap was smooth with the key-hole mount, the blade had the Victory Stanley logo and the adjustment wheel was the older solid-filled style. I thought it might have been a miniature model of a No.4 or a salesmans sample, so I held it up and asked Dave what it was. When he answered, "Stanley No.1; $1300", it blew me away. I had read a number of articles on this plane and had pretty much decided I would never own one because of its size. Being able to hold an almost perfect example of one in the palm of my hand this morning, I thought to myself, "Yup. Mitchell, you will never own one of these things". Its cute, Ill give it that, but if the only way you can describe something like this is to use the word, "cute", it aint no tool I want to own. Even though I had confirmed my suspicions about this plane, the whole experience did leave me feeling a little foolish. Some tool collector, eh? I didnt even recognize the infamous Stanley No.1.
As if the Stanley No.1 introduction didnt make me feel foolish enough, I had to add to it at the Sauer & Steiner Toolworks booth. This world renowned plane making firm is also present at every one of the Tools of the Trade shows. Each time I passed them my eye was drawn to a mitre plane they had on display, one that appeared to be about 10" in length by about 2¼" in width. Finally, during the forth go-round I stopped to have a look. I have been thinking for over a year now of making a dedicated shoot board plane, but first I have to finish the actual shooting board. I slapped together a temporary shoot to use while I was still playing with the final ones design and use my Veritas 15" Low-Angle Jack Plane with it. I love this plane but it is just too damned light to use for shooting. What I want is a hernia-inducing slug of metal that wont deflect off the end grain like the Veritas does. When I picked up this Sauer & Steiner, it immediately just felt right for the job. I had been all over this companys website a few times and have read much about their products, which are beautifully built, by the way, so I already had a rough idea what the cost of the plane was, but hoping a miracle had happened and the prices had fallen, I asked. I dont know if it was monsieur Sauer or monsieur Steiner that answered, but whichever it was, the answer was, "About 5". That answer didnt register with the number I had in my head for some reason, and I blurted out, "Hundred?" Either not wanting to embarrass me further, or not wanting to telegraph it throughout the hall, the conveyor of the information mouthed the word, "Thousand", as he smiled and shook his head. The thing is, I was thinking $6k when I walked up to the table, but still ended up walking away red-faced and embarrassed. I can get myself into these predicaments, I tell ya.
So what did I end up carrying home after four hours of frenzy feeding on vintage tool delights?
I arrived at the show looking for three specific items and walked out with one of them. I went in looking for the bullnose attachment for my Stanley No.72 Chamfer, a Stanley No.20 square, something longer than 16", and, of course, any tool stamped "H.E. Mitchell". I left with the square.
Long Stanley No.20 squares are a rarity, indeed. Not only did I find a long one, I found the longest one made. Not only that, I found it at an excellent price. While they rarely show up, the few that I have seen for sale have sold for anywhere from $95 on eBay for a very poor example, to $165 on a dealers online store for a good example. I picked up this one for $75 and I think it may clean up quite nicely.
The Tools of the Trade Show may not be near the size and depth of some of the larger American and British versions, but for our little corner of the world, it is a little bit of tool heaven.
Peace,
Mitchell
While I am sure not many of you are asking yourselves, "why does Canada have such limited (and hidden) vintage tool sources?", I will answer it anyway.
Canada basically, when it comes to retailers with narrow and shallow inventories...sucks.
Here are some stats for you to consider...
Population
United States - 311 million (ranks 3rd)
Canada - 34.4 million (ranks 36th)
Land Mass
Canada - 3.86 million square miles
United States - 3.7 million square miles
Population Density
United States - 31.6 people per square mile
Canada - 3.3 people per square mile
Building an average 50-mile stretch of highway in Canada and the United States...
Average cost per mile - $500,000
50-mile stretch - $25 million to complete
Density along one mile of highway
United States - 316 people
Canada - 33 people
While developing a profitable retail business is more difficult in Canada than it is in the United States, we do have more and larger natural spaces for us to go to and lick our wounds after the bailiff has done his job and we have more time on our hands :o)
All values taken from results of Internet searches and may or may not be accurate.
Read More..
In the past two years I have found that the dealers had more tools on their tables than there were potential customers to buy them. This year I felt this ratio was in reverse. I think some of the dealers were gun-shy, so they cut back on their inventories and displayed less. As a sign the economy is possibly turning around, I think the buying numbers swelled this year but faced a lesser number of choices. It is possible that I also overheard more haggling over price this year than I have heard in the recent past. As an example of this, I returned to one dealer to talk price about a plane I saw about 75 minutes previous only to find that the plane gone, along with about 90% of the rest of his inventory. I mentioned that it looked like he did quite well that morning and he answered that he thought his customers made out much better than he did. Signs that displayed, "Prices are negotiable" were commonplace.
Doug Orr, the writer of all things vintage in the Lee Valley Tools Newsletters, had his booth up and running, crammed full of wood moulding planes (sadly, no H.E. Mitchells) and other tools of quality. We discussed a beautiful, but unmarked, ¾" steel shoulder plane with what I think was a walnut infill that I picked up off his table. This thing was amazingly built with a price of $155. He told me that it had an $85 blade in it, which barely poked out of the finest mouth I have ever seen on any plane. The mouth was so fine in fact, that I reluctantly put it back on the table. Looking at the mouth of that plane, I knew that with my limited plane abilities at this point, I was looking at buying $155 worth of pure frustration. Maybe one day, when my skills with these things improve, I wont be so quick to put things down that intimidate me, but today wasnt that day.
 |
| Doug Orrs booth is always loaded with crates of wood moulding planes in every profile imaginable. |
 |
| Doug also has a number of feature planes and other tools displayed across his shelves and tables. They are easier to see, but you really feel like you "scored" when you find a needed one while routing through the bins. |
As with every show, Martin J. Donnelly Tool Auctions was front and centre. Personally, I really appreciate this company being present as it gives this show the vintage tool trades "Stamp of Approval". Too often we Canadians are treated as distant relatives by our American cousins, and it is good to see we are worthy of Martin making the long drive up here (do you hear that you eBayers that wont ship to Canada). While here, Martin also takes on the job as speaker at the meeting held before the show by The Tool Group of Canada. Maybe there is enough of us up here to convince companies like Jim Bode Tools to share the driving chores with Martin in the fall.
I also got to hold my first Stanley No.1 Bench Plane this morning, which was quite an event, I can assure you. I saw this little plane sitting on a rack in Dave (ToolRush) Carrieres big booth. The bed was unmarked, the lever-cap was smooth with the key-hole mount, the blade had the Victory Stanley logo and the adjustment wheel was the older solid-filled style. I thought it might have been a miniature model of a No.4 or a salesmans sample, so I held it up and asked Dave what it was. When he answered, "Stanley No.1; $1300", it blew me away. I had read a number of articles on this plane and had pretty much decided I would never own one because of its size. Being able to hold an almost perfect example of one in the palm of my hand this morning, I thought to myself, "Yup. Mitchell, you will never own one of these things". Its cute, Ill give it that, but if the only way you can describe something like this is to use the word, "cute", it aint no tool I want to own. Even though I had confirmed my suspicions about this plane, the whole experience did leave me feeling a little foolish. Some tool collector, eh? I didnt even recognize the infamous Stanley No.1.
 |
This Stanley No. 1 caught my eye, big time, mainly because I couldnt figure out what the hell it was. |
 |
| Dave (ToolRush) Carrieres booth displays a smorgasbord of woodworking delights. |
As if the Stanley No.1 introduction didnt make me feel foolish enough, I had to add to it at the Sauer & Steiner Toolworks booth. This world renowned plane making firm is also present at every one of the Tools of the Trade shows. Each time I passed them my eye was drawn to a mitre plane they had on display, one that appeared to be about 10" in length by about 2¼" in width. Finally, during the forth go-round I stopped to have a look. I have been thinking for over a year now of making a dedicated shoot board plane, but first I have to finish the actual shooting board. I slapped together a temporary shoot to use while I was still playing with the final ones design and use my Veritas 15" Low-Angle Jack Plane with it. I love this plane but it is just too damned light to use for shooting. What I want is a hernia-inducing slug of metal that wont deflect off the end grain like the Veritas does. When I picked up this Sauer & Steiner, it immediately just felt right for the job. I had been all over this companys website a few times and have read much about their products, which are beautifully built, by the way, so I already had a rough idea what the cost of the plane was, but hoping a miracle had happened and the prices had fallen, I asked. I dont know if it was monsieur Sauer or monsieur Steiner that answered, but whichever it was, the answer was, "About 5". That answer didnt register with the number I had in my head for some reason, and I blurted out, "Hundred?" Either not wanting to embarrass me further, or not wanting to telegraph it throughout the hall, the conveyor of the information mouthed the word, "Thousand", as he smiled and shook his head. The thing is, I was thinking $6k when I walked up to the table, but still ended up walking away red-faced and embarrassed. I can get myself into these predicaments, I tell ya.
So what did I end up carrying home after four hours of frenzy feeding on vintage tool delights?
I arrived at the show looking for three specific items and walked out with one of them. I went in looking for the bullnose attachment for my Stanley No.72 Chamfer, a Stanley No.20 square, something longer than 16", and, of course, any tool stamped "H.E. Mitchell". I left with the square.
Long Stanley No.20 squares are a rarity, indeed. Not only did I find a long one, I found the longest one made. Not only that, I found it at an excellent price. While they rarely show up, the few that I have seen for sale have sold for anywhere from $95 on eBay for a very poor example, to $165 on a dealers online store for a good example. I picked up this one for $75 and I think it may clean up quite nicely.
 |
| I came home with this 20" Stanley No.20 with the arm hanger still attached, all for a cool seventy-five bucks. The image has the blade looking waved, but that is a result of lighting and dirt, The blade is actually dead-straight. |
Peace,
Mitchell
While I am sure not many of you are asking yourselves, "why does Canada have such limited (and hidden) vintage tool sources?", I will answer it anyway.
Canada basically, when it comes to retailers with narrow and shallow inventories...sucks.
Here are some stats for you to consider...
Population
United States - 311 million (ranks 3rd)
Canada - 34.4 million (ranks 36th)
Land Mass
Canada - 3.86 million square miles
United States - 3.7 million square miles
Population Density
United States - 31.6 people per square mile
Canada - 3.3 people per square mile
Building an average 50-mile stretch of highway in Canada and the United States...
Average cost per mile - $500,000
50-mile stretch - $25 million to complete
Density along one mile of highway
United States - 316 people
Canada - 33 people
While developing a profitable retail business is more difficult in Canada than it is in the United States, we do have more and larger natural spaces for us to go to and lick our wounds after the bailiff has done his job and we have more time on our hands :o)
All values taken from results of Internet searches and may or may not be accurate.
Monday, February 10, 2014
The Ply Wooden Boat Part IV Shes Got To Float
With the keel finished, construction of the boat was done and it was time to waterproof. When Eric made his plywood boat on GardenFork.tv, he used liberal amounts of silicone caulking as waterproofing. As a professional roofer and waterproofer, this made me cringe. Contrary to popular marketing, silicone is not the be-all and end-all of caulking. When compared to commercially available urethane and moisture curing polyether sealants, silicone is crap for most applications. I used the best caulking Ive ever used, M-1, between the plywood panels & the battens. Then I sealed all of the exterior joints and the screw heads with the new M-1 Marine.
Chem Link was kind enough to send me some M-1 Marine to try out. Its designed for applications in consistently damp marine environments. It can even be used in underwater applications (post curing). In application, the M-1 marine was just as easy to tool as standard M-1. While I cant describe my boat as consistently damp, the M-1 marine did an excellent job of sealing the joints and screws.
At this point, with the boat constructed and the joints sealed, many would have called it done, put on a decorative coat of paint if desired and set out to sea.
Alas, I am the few (not the many) and knowing what I do about waterproofing and having access to the waterproofing products that I do, I had to seal the boat more. Once the M-1 Marine was dry, I then coated the entire outside of the hull with BARR waterproofing, also by Chem Link.
BARR is a liquid waterproofing. It comes it what look like giant toothpaste tubes. To apply it, I squeezed the tubes out into a plastic cup and used a cheap, disposable paint brush. First I put a coat of BARR over the joints. Then I covered the entire exterior hull with BARR, right up to the underside of the batten.
Once the boat was coated, I allowed the BARR to dry overnight before dropping it in the lake.
Read More..
 |
| A little M-1 sealant here, a little M-1 sealant there . . . |
Chem Link was kind enough to send me some M-1 Marine to try out. Its designed for applications in consistently damp marine environments. It can even be used in underwater applications (post curing). In application, the M-1 marine was just as easy to tool as standard M-1. While I cant describe my boat as consistently damp, the M-1 marine did an excellent job of sealing the joints and screws.
 |
| M-1 Marine is very good sealant. |
Alas, I am the few (not the many) and knowing what I do about waterproofing and having access to the waterproofing products that I do, I had to seal the boat more. Once the M-1 Marine was dry, I then coated the entire outside of the hull with BARR waterproofing, also by Chem Link.
 |
| The now empty original tube and new bucket filled with BARR. |
 |
| The joints coated and beginning on the bow. |
 |
| A close up of the stern and keel after being coated with BARR. |
 |
| The finished boat, ready for the lake. |
Coming up in Part V, well take here out on the open lake.
For more about the (Ply)Wooden boat, read these posts.


Subscribe to:
Posts (Atom)