Showing posts with label i. Show all posts
Showing posts with label i. Show all posts
Monday, February 24, 2014
I HACKED THE HEMNES SECRETARY DESK
Im not sure what constitutes an official Ikea Hack but check out what I did to
an Ikea Hemnes Secretary Desk.

Below to the left is what an original Hemnes Secretary Desk looks like (older model)
On the right is how it looks after I replacing the legs with curvy dining table legs.
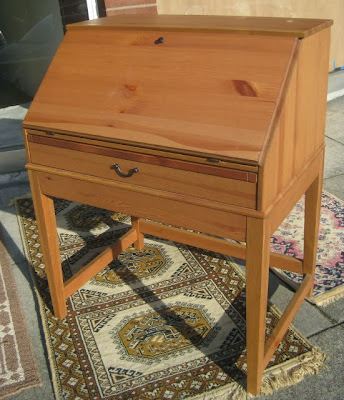

BEFORE AFTER

The Hemnes Secretary Desk is all pine wood and the top portion is all complete and can be
separated from the bottom by undoing eight "L" brackets.
That will leave you with a simple base frame to work with. You can see each of the
brackets sitting at the top edge on the inside of the frame.

These metal corner brackets are original and held the straight leg in place. I moved them
down to line up with the threaded rod of the replacement leg.


I then reattached the top to the base and painted it in a creamy distressed white.


There is a bankers chair that goes with the desk. It is a modern oak chair with a really
high lift that works perfectly with the desk. I cut out areas for the chair arms to tuck right
under the desk when its not being used.
This IKEA Hacked secretary desk with bankers chair is listed on the SHOWROOM page with
price and dimensions.
************************************

Wednesday, February 12, 2014
I had it then I lost it
...free time, that is. This afternoon was supposed to be empty. My Thursday class finishes at 1:30, I have no Friday classes, and this weekend is Fall Break so my next class isnt until Wednesday. I was even considering actually cleaning up the garage...thats how much time I was suppose to have. Then the doorbell rang...
FedEx...oh my, what could it be?

Looks like someone got a new saw kit, holdfast, and making knife...

I was a little surprised here. This package wasnt supposed to arrive until tomorrow. Then again, it was FedEx. Had they used USPS Im sure the package wouldve already been through Hartsfield-Jackson twice and currently be en route to Nome, Alaska via dog sled.
So as I said, I had lots of free time and then completely lost it once the saw kit arrived. Typically the handle on this style saw is made out of fruitwood or some such dense species. I dont have any of that nonsense lying around, nor do I feel like spending more money. As such, I was left with two options: mahogany or maple. I like maple a lot, you can really almost do anything with it and it isnt too expensive. On the other hand, this saw has a fair amount of brass on it and in my opinion you cant beat brass and mahogany together.
Mahogany it was...

Well, maybe. It aint exactly the toughest wood out there. I used the same template/router bit method that I tried with the ebony tote earlier this week and things were going fine--you can see from the picture that I was about 90% done with the blank--when something caught the bit wrong and the blank just snapped right then and there. Damnit.
I decided to give mahogany one more try, only this time I used the scroll saw for the whole thing--again, just like I ended up doing with the tote. Ive come to the conclusion that the template bit should only be used for simple patterns with lots of straight lines when the wood is close to an inch thick. Thinner stuff is no problem.
Next I drilled the two holes that connect the blade to the handle. I included the drilling sequence in the photo:
 1/2" Forstner, 3/16", 1/16", flip, Forstner, 3/16". Very easily done on the drill press.
Next came the part that I was half anticipating, half dreading: setting the blade in the spine. This is the part Ive mentioned previously and included that video of the Gramercy guy beating the blade with a modified cricket bat. I just went straight at it.
Start the blade by hand:

Then beat it in a little bit at a time:
 No sweat.
Then I had to carve out the notch and spline for the now brass-backed saw to sit in the handle. The first step is to mark a nice centerline running around the area Im going to work on. Heres an easy way to establish a quick centerline:
 I set my marking gauge reasonably close to what I think looks like the center and then etch a line. Then I flip the piece over and etch another line. In the above picture, these are the two upper outside lines. After I have these two line established, its easy to set the gauge exactly in the middle of the two lines; this would be the centerline. No tedious measuring needed. After this I cut the spline into which the actual blade will fit:

The dozuki was actually perfect for this task because the kerf of the saw is just about equal to the width of the Gramercy blade.
Then I had to remove material so that the brass spine would fit in the handle:
 The instructions called for an 11/64" bit for this. Who has one of those lying around? Had to make it work with a 5/32" and a chisel. The blue masking tape on the bit is my depth gauge. That reminds me of a funny video I saw yesterday:


Read More..
FedEx...oh my, what could it be?
Looks like someone got a new saw kit, holdfast, and making knife...
Everything here was made in the US...even the cheap little knife. Apparently the Zona people took over the X-acto facility when X-acto left for China.
I was a little surprised here. This package wasnt supposed to arrive until tomorrow. Then again, it was FedEx. Had they used USPS Im sure the package wouldve already been through Hartsfield-Jackson twice and currently be en route to Nome, Alaska via dog sled.
So as I said, I had lots of free time and then completely lost it once the saw kit arrived. Typically the handle on this style saw is made out of fruitwood or some such dense species. I dont have any of that nonsense lying around, nor do I feel like spending more money. As such, I was left with two options: mahogany or maple. I like maple a lot, you can really almost do anything with it and it isnt too expensive. On the other hand, this saw has a fair amount of brass on it and in my opinion you cant beat brass and mahogany together.
Mahogany it was...
Well, maybe. It aint exactly the toughest wood out there. I used the same template/router bit method that I tried with the ebony tote earlier this week and things were going fine--you can see from the picture that I was about 90% done with the blank--when something caught the bit wrong and the blank just snapped right then and there. Damnit.
I decided to give mahogany one more try, only this time I used the scroll saw for the whole thing--again, just like I ended up doing with the tote. Ive come to the conclusion that the template bit should only be used for simple patterns with lots of straight lines when the wood is close to an inch thick. Thinner stuff is no problem.
Next I drilled the two holes that connect the blade to the handle. I included the drilling sequence in the photo:
Next came the part that I was half anticipating, half dreading: setting the blade in the spine. This is the part Ive mentioned previously and included that video of the Gramercy guy beating the blade with a modified cricket bat. I just went straight at it.
Start the blade by hand:
Then beat it in a little bit at a time:
Then I had to carve out the notch and spline for the now brass-backed saw to sit in the handle. The first step is to mark a nice centerline running around the area Im going to work on. Heres an easy way to establish a quick centerline:
I know, I said the workbench would be the dozukis last project...I was wrong.
The dozuki was actually perfect for this task because the kerf of the saw is just about equal to the width of the Gramercy blade.
Then I had to remove material so that the brass spine would fit in the handle:
How to chuck a drill bit. from Woodzealot on Vimeo.
It took a lot of trimming and tuning, but finally the blade fit perfectly:
You can see the caps of those nice brass bolts. Their respective nuts required a split nut driver to tighten them. Fortunately these are very similar to chainring bolts on bicycles and I just happened to have the appropriate wrench for the job. Actually I had two of them which was good because a little bench grinder time was needed to adapt it for the job.
A little rasping, a little filework, a little sandpaper, a little satin wax...
Cute little bugger, aint it? Now, maybe Im just used to dull saws, but this thing was quick! If you want to you can bury it in two strong strokes. Blink and you miss it. Im still getting used to cutting on the push stroke but I dont think it will take too much getting used to.
Kinda makes me want the bigger one too. They come as a kit as well...how long til Christmas?
Monday, February 10, 2014
Duplicate and I Like It But Dont Love It Tools For Sale
Up for sale are a few of my duplicate tools, as well as a couple of tools that I like, but dont love.
Below is a "Gallery" photo of all the tools I have for sale with a link above and below it. Click on either of those links as they will take you to the Tools For Sale page.
Go to Full Tool Listings

Go to Full Tool Listings
I have posted individual listings for each tool on my own server because Blogger has limited space when it comes to imaging. Each tool has enough photos to let you know what condition it is in, plus a written description.
Each tool listing displays the price I want to sell the tool for. They may not be the prices you wish to pay for them, but then they never are. I have also listed what I paid for the tool originally. Some I have listed for less than what I paid, some more, and some the same, but I didnt include what I paid for shipping so either way, Im not going to win on any of this. Heres the point Im trying to make; I dont mind getting wet selling these tools, but I already had a bath today. If I cant sell the tool for what I have listed it for, Id rather keep it.
If you want one of these tools, email me using the supplied link for each tool and I will mark the listing as sold. The first email committing to purchase a specific tool is the winner. I will reply the following day with the total cost of the tool plus my cost for shipping, as well as the cost for additional shipping if required. Please use the links supplied. Your email window should open with the tool you want already listed in the subject field, along with the tools sale number.
I expect payment within 48 hours after sending you the invoice. I truly want to sell these tools within my lifetime, so I think this gate is fair to both. If I dont receive payment, Ill pull the sold notice on the tool and try again. Your ears may burn for a few days, but I wont be sending the "boys" after you.
As far as payment options, you can pay me whichever, however or whatever way you want, as long as it is through PayPal. Once PayPal notifies me that I have received payment, the purchase will be shipped the following day.
Not going into the vintage tool business disclaimer:
- To clear up any questions, I am not going into the vintage tool business, I have no plans to go into the vintage tool business, and trust me, I never want to go into the vintage tool business. The tools offered here are ones that were intended for my own collection when I purchased them, and over time I found I either do not want them, or have found another that suits my needs better.
Fine-Print Stuff:
- Delivery:
- Anywhere in the world.
- Packaging:
- No charge for packing materials
- Shipping Service Used:
- Canadian Post Office "Expedited Parcel"
- lowest price available that facilitates tracking
- Includes $100 in shipping insurance
- Typically 6 to 10 days for shipments to the U.S.
- Faster service available at additional charge
- Example Shipping Price:
- 12" by 12" by 3" parcel weighing 2 pounds
- Sent to Illinois, U.S.
- Cost: $20.63
- Shipping Quotes:
- Before commitment to purchase - ask and you shall receive
- After commitment to purchase - stated on invoice
- Actual Shipping Costs Upon Shipment:
- If I under-quoted the shipping charges - I will eat the difference
- If I over-quoted the shipping charges - Ill include a money order for the difference in the shipment
- Multiple Items:
- No problem
- Shipping Insurance:
- No shipments without insurance for the full purchased value
- Expedited Parcel includes $100 with of insurance
- Insurance on values over $100 is purchased at $1.50 per $100
- Returns:
- If I send you the wrong tool, I will refund your money including shipping
- If it is proven that the tool is not in the same condition as it was represented to be in the listing, I will refund your money including shipping
- If you change your mind, decide you dont like the tool, or get hell from your wife because you bought it, Im afraid you are on your own
- Payment Options:
- One - PayPal only
- Currency:
- Whichever is cheaper
- With the way the currency is fluctuating these days, one day the US Dollar is high and the next, its the CAN Dollar so pick which currency works results in the cheapest cost to you
Go to Full Tool Listings
Peace,
Mitchell
Thursday, February 6, 2014
Up Up and Away I Hope
Am I imagining things, or are the prices of planes going up?
I have been pondering this possibility for a while now. I think the online dealers prices have been slowly creeping up over the past couple of months and while the typical eBay junk is still the same, the eBay dealers prices are also climbing a bit. I thought maybe it was my imagination, but after having a gander at Leachs preverbal tool list this morning, Im starting to waver between possible and probable.
Heres a few examples that have caused me to firm up my opinion a bit...
ST12 #2 smoothing plane; a cleaned ca. 1900 example, with a 1930s iron, a no-harm bruise at toe, lever cap is a #3 ground narrower to fit the plane, its a solid worker in all regards, and priced for someone who doesnt wish to pay the MSRP of a pristine example; top right: http://www.supertool.com/forsale/jan/t17.jpg - $175.00
I also came across one of these on eBay this morning that was a tad rough around the edges, but over-all not a bad type 7 that an eBay dealer was selling for $295.00.
I have two of these, both bought from dealers and both graded on the cusp of excellent-workers and good-collectors. One I paid $45.00 for and the other, $125.00, both within the last 5 years.
ST68 #7 jointer; a type 11, with all original parts, made ca. WWI, no damage, nicely cleaned, 90% japanning, all it needs is honing; bottom: http://www.supertool.com/forsale/jan/t128.jpg - $185.00
I bought a type 7 three years ago from a dealer for $175 and its condition is so good, I thought it was still under warranty.
As an aside, Patrick had one listing that really firmed up my decision to never buy a No.1...
ST51 #1 smoothing plane, damage, offered for parts; the nose section snapped off, it has a good "STANLEY" embossed lever cap, sweetheart logo iron and cap iron, and frog; top of tote is gone; the front section can be ground clean to make it a chisel plane, or you can grab parts off it for your plane; top left: http://www.supertool.com/forsale/jan/t107.jpg - $345.00
A couple of years ago another dealer had a box for a No.1 listed for $1400.00 - just the box. Now Patrick has the back half of one listed for $345.00. I get the rarity of this plane is what drives the price, but still...sheesh. The only reason it is rare is that no woodworker worth his salt wanted one of these silly little things when they were new.
By the way, if you arent getting them already, you can sign up to receive Patricks SuperTool monthly lists by emailing him at leach@supertool.com.
So is it possible that plane prices are creeping up? Im still not sure because that isnt supposed to happen. There has been an unbelievable number of vintage planes that have been dumped on the market over the past few years, mainly coming from collectors who are liquidating, or from their heirs who want nothing to do with a bunch of old tools. When supply outstrips demand, prices fall, so how can inflationary prices exist in the market? If it is happening...cool.
This probably isnt the time to mention this, but I am still looking for a good type 7 No. 6 Stanley, and if anyone knows a screw from another plane that will work to holding a Stanley No.386 fence to a plane, I would appreciate you letting me know. Finding replacement thumb screws for this fence is a real bugger.
I had to stop working on the mount for my Stanley No. 50 because I want to tie it into the mount for my No.51 that is going to run up beside it. Here is where it stands today with the template for a layout for its mates...
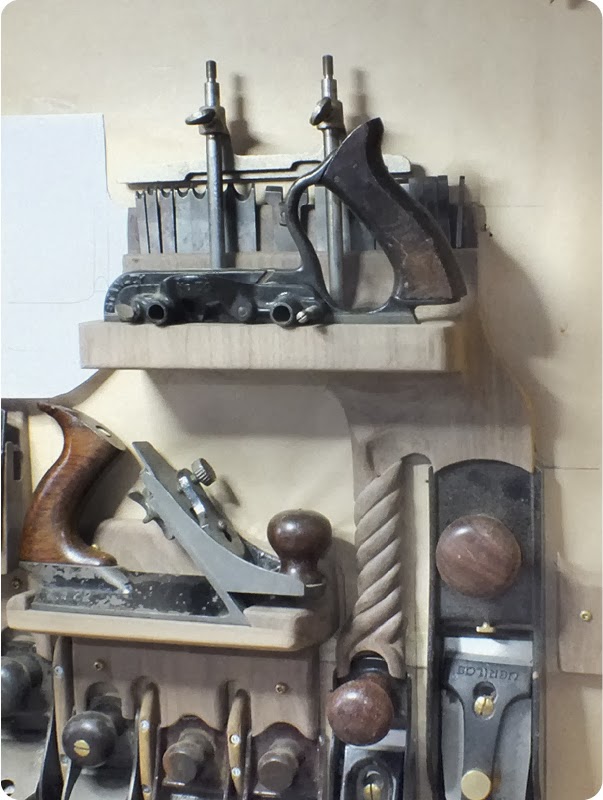


It really was a difficult plane to design a mount for, which ended up with more dips and dives than I expected. The entire thing is made from a glue-up of walnut with all the grains running vertical.
Here is the plane head-on. With all its bits and bobs, it is 3" wide, but because the widest part of the actual plane body is the tote that is slightly thicker than ¾", there is a lot of empty space around it, making the mount look like a 1950s era continental kit...

Because I have a lot of resawing to do for this project, I decided it was time to make the Frame-Saw I bought blades for about 4-years ago, so that will be what I will be posting about next. Because I do not have my lathe up and running, Im currently rounding off parts of some ⁵⁄₈" square brass stock by hand so I can thread them. I should have photos and my usual verbal diarrhea about them up within the week.
Peace,
Mitchell
Subscribe to:
Posts (Atom)