Showing posts with label part. Show all posts
Showing posts with label part. Show all posts
Wednesday, March 5, 2014
Enterta er TV stand build Part 1 of 2 Or 3
Heres the beginning of the construction from this past weekend, although Im not sure how much construction actually took place. Well, like I said, I was able to complete the front legs.
Im not certain how far I will get this weekend as I will be busy with The Most Lamentable Comedy and Most Cruel Death of Pyramus and Thisbe. I play the part of a thespians dad who drives around a lot.
Read More..
Im not certain how far I will get this weekend as I will be busy with The Most Lamentable Comedy and Most Cruel Death of Pyramus and Thisbe. I play the part of a thespians dad who drives around a lot.

Sunday, February 23, 2014
VENEER removal part 4 of 4
This is the final article of the my VENEER series.
Todays article is about how to easily remove large sections of veneer.

Why does veneer start to lift from furniture anyway?
Hands up ... any guesses?
The ladies who have taken my workshop are not eligible so put your hands down.
The answer is
*MOISTURE*
Veneer is typically adhered with water based glues and
when water gets under the edges of the veneer it softens the glue and starts to lift.
I.E.
damp basement,
on a porch in bad weather,
moisture under a potted plant or vase

Once you have made the decision to remove the veneer
set up your furniture so the surface to be worked on is facing up.

Go get a towel big enough to cover the area of veneer and soak it with water.
You do not need hot water but make sure it is saturated but not dripping.
Spread out your wet towel over the veneer to be removed making sure the water
can get absorbed under the edges and open areas to soften the glue.

Here is the
** work smart not hard part **
Time to watch a movie, go to the grocery store, or do the laundry.
In other words leave it alone to do the work for you,
for at least an hour.

When you come back to the project you should be able to
easily start to lift and peel the veneer away.
ITS REALLY THAT SIMPLE!
The photos I have used for this article were taken over an hour and a half from start to finish.
There is no need to use heat guns, belt sanders, or nasty gauging tools from now on.
Just some more water and some time!!
CAUTION:
for the most part the decision should be made to remove veneer because the alternative is worse
but some veneers are covering up pieced together wood and wood with gauges and holes

Thanks for following along with my VENEER series
The first article explained how to deal with edge gluing loose veneer
The second article detailed filling in missing areas of veneer on painted furniture,
and the third article showed you how to get bubbled veneer glued back down.
Monday, February 10, 2014
Stephens Step Stool Part II
I made Stephen’s Step Stool from Douglas Fir. Our big box stores do not carry the fabled Southern Yellow Pine, so I settled on our local (not-so)equivalent.
I laid out the parts between the knots on the boards and cut them using my jig saw. Because the 2”x12”s were 10’ long, I cut them on the floor using scraps of wood to hold them up and provide blade clearance.
The 2” x 12” we used was wider than my 8” jointer so I flattened the faces with the planer alone. Once each piece was cut to length there was minimal bowing. The pieces were first fed through my planer with their concave side down. They were then continually passed through the planer, alternating faces between passes, until the board where reduced from 1½” to 1” thick.
Stephen proved a great help during the milling as he was able to keep an eye on the ClearVue cyclone attached to my shop vac and let me know when it began to clog. Planing ½” of thickness off of 11½” wide boards made about 45 gallons of chips.
After thicknessing the boards I finished milling them by flattening one edge on the jointer and then cutting to width on my table saw. Once milled and dimensioned we stickered them and called it a night.
 |
| Dry fitting before joinery. |
The following day I cut the dovetails using my Keller 2200 Journeyman Dovetail Jig. Some of the boards had cupped slightly, but I was able to clamp them up tightly and the dovetails cut reasonably well.
 |
| Milling the pins. |
Then I glued the front and rear sections of each side together using Nexabond glue. Since using it in my clamp rack I’ve been impressed with Nexabond’s performance. Hopefully +Christopher Adkins will mail me my WIA Nexabond soon.
While the glue on the sides dried, the remaining pieces spent the night re-stickered.
Dont forget about the +Modern Woodworkers Association Podcast. We talk woodworking with Guests from around the world of woodworking every other week. Subscribe to the RSS feed or iTunes today.
New Deck Part 2
Well, installation of the decking was begun and nearly completed the next day, but we were short a few pieces of decking, so more had to be ordered.
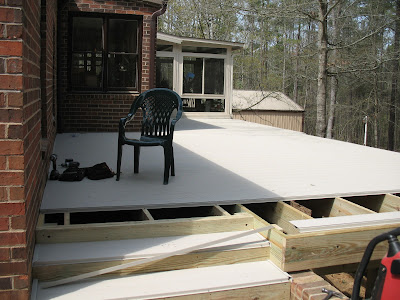 Work will start back again today with installation of the decking on the stairs, and hopefully some work on the railings.
The decking that was installed was been trimmed along the edge and caps were installed on all sides of the deck where the decking was already installed. They got the stair treads installed today.
Getting the caps on three edges was a bit tedious, but really trims out the planking nicely.
Discovered that the directions for assembly the rails can be misleading, I think things have changed and the instructions have not. Also, the same distance measurement in two different places reference off of different points and it is easy to miss.
Part 3
Read More..
The decking that was installed was been trimmed along the edge and caps were installed on all sides of the deck where the decking was already installed. They got the stair treads installed today.
 |
| Waiting for the trim. |
 |
| Putting trim around the edges. |
 |
| One section of rail and almost all the posts assembled. |
Part 3
The Ply Wooden Boat Part IV Shes Got To Float
With the keel finished, construction of the boat was done and it was time to waterproof. When Eric made his plywood boat on GardenFork.tv, he used liberal amounts of silicone caulking as waterproofing. As a professional roofer and waterproofer, this made me cringe. Contrary to popular marketing, silicone is not the be-all and end-all of caulking. When compared to commercially available urethane and moisture curing polyether sealants, silicone is crap for most applications. I used the best caulking Ive ever used, M-1, between the plywood panels & the battens. Then I sealed all of the exterior joints and the screw heads with the new M-1 Marine.
Chem Link was kind enough to send me some M-1 Marine to try out. Its designed for applications in consistently damp marine environments. It can even be used in underwater applications (post curing). In application, the M-1 marine was just as easy to tool as standard M-1. While I cant describe my boat as consistently damp, the M-1 marine did an excellent job of sealing the joints and screws.
At this point, with the boat constructed and the joints sealed, many would have called it done, put on a decorative coat of paint if desired and set out to sea.
Alas, I am the few (not the many) and knowing what I do about waterproofing and having access to the waterproofing products that I do, I had to seal the boat more. Once the M-1 Marine was dry, I then coated the entire outside of the hull with BARR waterproofing, also by Chem Link.
BARR is a liquid waterproofing. It comes it what look like giant toothpaste tubes. To apply it, I squeezed the tubes out into a plastic cup and used a cheap, disposable paint brush. First I put a coat of BARR over the joints. Then I covered the entire exterior hull with BARR, right up to the underside of the batten.
Once the boat was coated, I allowed the BARR to dry overnight before dropping it in the lake.
Read More..
 |
| A little M-1 sealant here, a little M-1 sealant there . . . |
Chem Link was kind enough to send me some M-1 Marine to try out. Its designed for applications in consistently damp marine environments. It can even be used in underwater applications (post curing). In application, the M-1 marine was just as easy to tool as standard M-1. While I cant describe my boat as consistently damp, the M-1 marine did an excellent job of sealing the joints and screws.
 |
| M-1 Marine is very good sealant. |
Alas, I am the few (not the many) and knowing what I do about waterproofing and having access to the waterproofing products that I do, I had to seal the boat more. Once the M-1 Marine was dry, I then coated the entire outside of the hull with BARR waterproofing, also by Chem Link.
 |
| The now empty original tube and new bucket filled with BARR. |
 |
| The joints coated and beginning on the bow. |
 |
| A close up of the stern and keel after being coated with BARR. |
 |
| The finished boat, ready for the lake. |
Coming up in Part V, well take here out on the open lake.
For more about the (Ply)Wooden boat, read these posts.
Tuesday, January 28, 2014
Stephens Step Stool Part VI
I’ve been wanting to play with dye for a while, so I figured that Stephen’s Step Stool would be a perfect project to experiment with. Before putting any dye on the stool itself, I tested a few dye mixtures on a sample board I had sanded with the stool. I tried General Finishes and TranstintBlue Dyes. While the General Finishes is ready right out of the can, the Transtint needs to be diluted. I tried one dilution with denatured alcohol and one with a .5 lb cut of shellac. All three (3) were ragged onto the sample board.
 |
| Three dyes, almost the same coloring. |
When they dried, I had a hard time distinguishing them. They all seemed about the same color blue and the small difference there were seemed more to be the wood grain than the dye. I decided on Transtint in shellac since the shellac didn’t raise the grain like the water based General Finishes dye did and unlike the Transtint in alcohol, the Transtint in shellac provided a seal coat at the same time.
 |
| The finished dye. |
I ended up applying two (2) coats of blue tinted .5 lb cut shellac. The second coat not only made the blue color richer, it also allowed me to rub out streaks and other imperfections in the initial coat. Though the coloring wasn’t perfect it was still really cool and I’m quite pleased with how it came out.
As a finish, I’m applied 4 coats of General Finishes Arm-R-Seal, as per the method Marc describes in his A Simple Varnish Finish DVD. It’s a simple method of rag applying an oil/varnish blend. The results are good and hard to mess up.
 |
| The finished stool. |
With the finish on the stool went into Stephen’s room and it was time to get to those pesky Christmas projects. Now, what was it I’m supposed to build . . .
For all of the Step Stool posts, click here.
Dont forget about the +Modern Woodworkers Association Podcast. We talk woodworking with Guests from around the world of woodworking every other week. Subscribe to the RSS feed or iTunes today.
Sunday, January 26, 2014
New Deck Part 4
The guys got the stair rails installed today. They look great.


Apparently the company is aware that they need better instructions for the stair rails. Today I studied the situation and think I can write up something that will work. The company admitted to the contractor that they knew they need new instructions and are "working" on them. Guess Ill send them what I come up with.
Tomorrow they will put up the lattice and once again we are waiting for the rest of the materials.

Part 4.5
Part 5
Read More..
Apparently the company is aware that they need better instructions for the stair rails. Today I studied the situation and think I can write up something that will work. The company admitted to the contractor that they knew they need new instructions and are "working" on them. Guess Ill send them what I come up with.
Tomorrow they will put up the lattice and once again we are waiting for the rest of the materials.
Part 4.5
Part 5
Subscribe to:
Posts (Atom)