Wednesday, February 5, 2014
Back At It!

Its been a while since Ive posted. A lot of my workshop garage activities recently have been very tool-focused. I have made a number of toy acquisitions recently and have been spending a lot of time restoring them and/or familiarizing myself with them. Ill try to point out new tools and talk a little about them as they come into play in my work.
Here was the situation:

Before I start narrating the construction, Ill go ahead and show you the almost-finished product. Hopefully this will help you make sense of the different pieces as they come together. There were some finishing details missing at this point, but it gives you an idea of what the general shape will be:

Alright, lets get on with it...
It all started with this nice board of southern yellow pine.

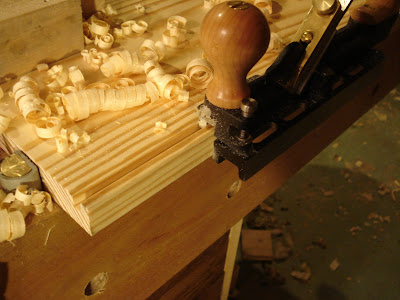
I bought this from a hardwood supplier, so it came with rough edges. Yellow pine is probably the most common lumber down here in the South at home centers where it comes surfaced on four sides (S4S). It was nice to find it with rough edges because that means Id get it for a couple of cents cheaper, plus Im starting to enjoy dimensioning lumber now that I have the right tools. To make it clear, the two broad sides here are ready to go, but the long edges are not: they are neither parallel, square, nor smooth. My first task is to get one side in order. I start with my jointer plane set to take a moderate shaving:

The jointer is the longest plane and it role is to produce a perfectly level surface. This is really easy...much of the skill is built into the tool.
The jointer makes a nice level surface from end to end, but not side to side. In other words, its difficult to have the long edge meet the two broad faces at a 90 degree angle (normal). Even if you are very particular in your jointer setup, you still usually take a thicker chip on one side than the other and this leads to the long edge being out of square. Which brings me to a new tool, my Veritas skew block plane:

I then cut and ripped different pieces to length and width to get the right sizes and then performed the same sequence on any unfinished edges.
It was now time to join the two large vertical pieces of the shelf. This would be the large back piece and that one side piece that was to be eventually cut down to a large curve. Ordinarily I wouldve just screwed and glued these pieces together, but now--thanks to a nice graduation gift from my in-laws--I have a better, cooler method: tongue and groove. Typically tongue and groove is thought of as an edge joint for two boards meeting at 180 degree angle--or zero degree, depending on the convention--but here they will be meeting at 90 degrees. I cant say Ive ever seen or heard of this done, but it makes good sense to me--particularly with a species like SYP that is so notorious for instability in the face of moisture change.
Behold: the Lie-Neilsen Tongue and Groove Plane:

Heres my unconventional face groove:*
*great name for a band
And here is the corresponding tongue:


Superfluous Tongues, thats another good band name. Speaking of such things, The Tongue and Groove would be a pretty great name for a dance club and if I ever have a little pub in my later years I think Ill call it The Dovetail Joint.
Anyhow, back to the woodworking. Heres the resultant joint:

Thats some clean joinery, if you ask me.
I then had to join the top platform to the rear vertical piece. Dovetails anyone?

This is the rear vertical piece that is receiving the tails. I was careful to ensure that the groove exit on the right was contained in a section that will be wasted so that it didnt show in the end.
Here is the corresponding pin board. This picture is of the underside of the top platform board as Im chopping out the sockets.

And here it is almost ready for a dry-fit: (just needs a little clean-up)

I then assembled the dovetail joint and screwed the top piece to the vertical side piece with counterbored screws. You can see in this photo that I had also already cut the curve in the vertical side piece:

The next step was to cut a simple notch into the piece that was to become the lower shelf:


I then dovetailed the front edge of the lower shelf to the front foot and screwed and glued it to the back vertical piece.

This produced the basic form of the shelf:

Now for some finishing business. The biggest issue is the counterbored holes from the screws. I have a 7/16ths plug cutter, so I always counterbore my holes that size. Heres the plug cutter:

...and heres what it does:

Then a quick rip-sawing will free the plugs:

If you look carefully, you can see that they have a little taper to them. This helps them be wedged down firmly into the counterbore...like this:

Then I just planed them flush with a block plane.
Last, I cut a hole in the top as a hair dryer holster, put on a coat of polyurethane, and called it done.


Subscribe to:
Post Comments (Atom)
No comments:
Post a Comment